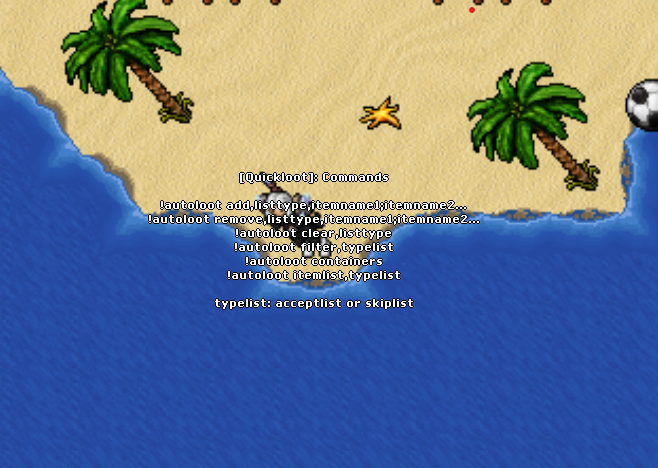
Autoloot Client 10 (commands)
Acceptlist, skiplist, and container via commands
How it works
Client 10 uses commands to keep two lists and a target container.
Acceptlist
Items you want to pick up. They go to the container you set.
Skiplist
Items you want to ignore. They are skipped on loot.
Container
Set with !autoloot containers and click the correct backpack.
Quick step-by-step
- Set the container:
!autoloot containersand click the backpack where loot should go. - Choose the active list:
!autoloot filter,acceptlist(pick) or!autoloot filter,skiplist(ignore). - Add items:
!autoloot add,acceptlist,item1;item2or!autoloot add,skiplist,item1;item2. - Check and clear:
!autoloot itemlist,acceptlistto view;!autoloot clear,acceptlistto reset before another hunt.
Main commands
Chooses the backpack that will receive loot. Open the desired backpack, type the command, and click it.
Keeps the pick list active. Use when you want to collect only what you added.
Keeps the ignore list active. Use when you want to refuse junk and pick the rest.
Adds items to the chosen list (acceptlist or skiplist). Separate with semicolons.
Removes specific items from the active list, keeping the rest.
Clears the entire list (accept or skip). Good before switching hunts.
Shows everything already saved in the given list (acceptlist or skiplist).
Ready-made examples
Coin farming
!autoloot filter,acceptlist!autoloot add,acceptlist,platinum coin;small ruby
Ignore junk
!autoloot filter,skiplist!autoloot add,skiplist,rat tail;broken helmet
Switch hunts
!autoloot clear,acceptlist!autoloot add,acceptlist,blue crystal shard
Container in Client 10
After defining the list, the correct backpack must be set:
- Open the backpack that will receive the loot.
- Use
!autoloot containers. - Click the opened backpack.
- Done: accepted items will always go to it.