
OTClient
Autoloot OTClient (visual interface)
Acceptlist and skiplist via Manage Containers and Bestiary
Updated on 17/04/2025
Administrator
Visual flow: Manage Containers for acceptlist/skiplist + Bestiary to add directly from drops. Commands are optional.
How it works
Two lists control what is looted or left on the ground.
Acceptlist
Items you always want to pick up. They go to the container defined in the panel.
Skiplist
Items you want to ignore. Autoloot will not touch them.
Interface first
Fill via Manage Containers or Bestiary. Use commands only for quick tweaks.
Everything is saved instantly, no relog needed. Switch lists for each hunt or boss.
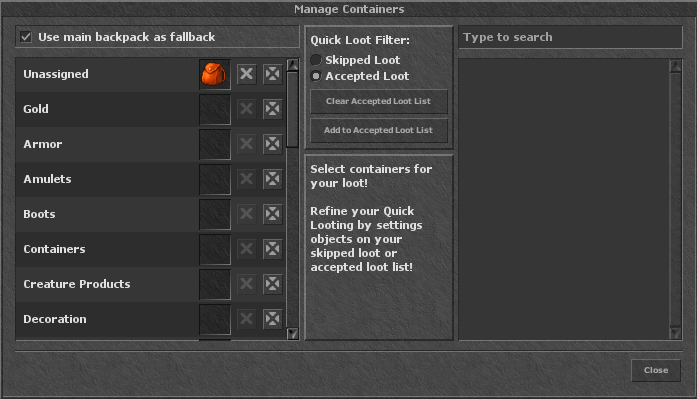
Setting up via Manage Containers
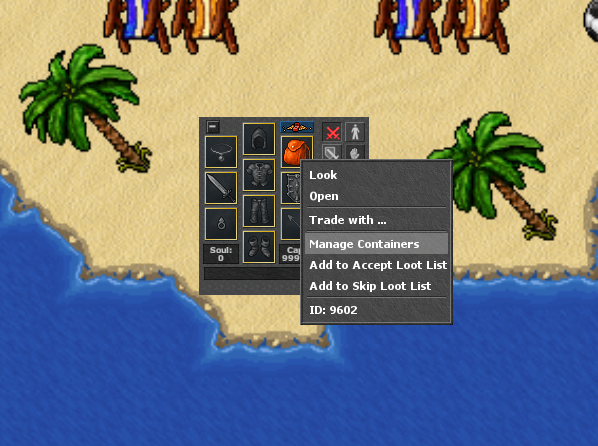
- Open your backpack and click Manage Containers.
- Choose the container that will receive the loot.
- On the left column fill the Acceptlist (items you want to pick up).
- On the right column fill the Skiplist (items you want to ignore).
- Save and close. Autoloot will use these lists right away.
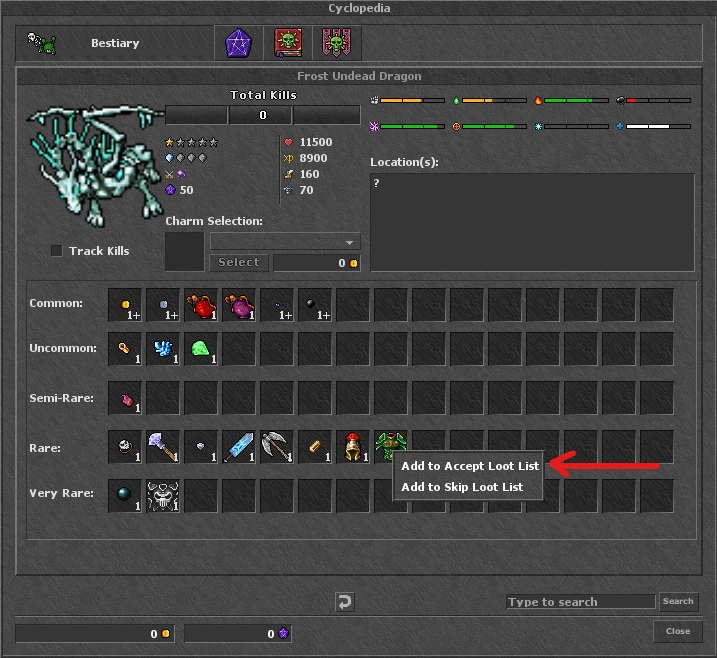
Adding via Bestiary
Use the creature drop list to mark what you want or do not want.
- Open the Bestiary and choose the creature.
- Click the drop item.
- Mark whether you want to accept or reject.
- Done: the item goes to the active list and applies to the next loot.
Commands (optional)
Use when you want a quick tweak without opening the panel.
Add
!autoloot add,acceptlist,item1;item2!autoloot add,skiplist,item1;item2
Remove / Clear
!autoloot remove,acceptlist,item1!autoloot clear,skiplist
Switch active list
!autoloot filter,acceptlist!autoloot filter,skiplist
View lists
!autoloot itemlist,acceptlist!autoloot itemlist,skiplist
Quick tips
- New hunt? Clear or switch the list before entering.
- Specific boss? Use Bestiary to accept only the drop you want.
- Limited space? Skiplist avoids filling with cheap loot.